樹莓派螢幕畫面及觸控旋轉設定

1. 畫面顯示旋轉

1.1 更新作業系統版本

1.1.1 檢查作業系統版本,輸入以下指令

cat /etc/os-release

輸出如下:

PRETTY_NAME="Raspbian GNU/Linux 10 (buster)"
NAME="Raspbian GNU/Linux"
VERSION_ID="10"
VERSION="10 (buster)"
VERSION_CODENAME=buster
ID=raspbian
ID_LIKE=debian
HOME_URL="http://www.raspbian.org/"
SUPPORT_URL="http://www.raspbian.org/RaspbianForums"
BUG_REPORT_URL="http://www.raspbian.org/RaspbianBugs"

1.1.2 若作業系統是 Raspberry Pi OS Bullseye 分支版本,則需要更新,執行以下指令,其他系統不需要,可以跳過。

sudo apt-get update
sudo apt-get full-upgrade

1.2 Raspberry Pi OS 和 Kali 畫面顯示旋轉

先檢查系統是否有加載 KMS 或 FKMS 驅動。

查看方法:在 /boot/config.txt 中,看對應的主板是否有打開 dtoverlay=vc4-kms-v3d 或 dtoverlay=vc4-fkms-v3d。

1.2.1 若有加載 KMS 或 FKMS 驅動,使用以下命令進行畫面顯示旋轉:

sudo nano /etc/xdg/lxsession/LXDE-pi/autostart

在 autostart 檔案尾端輸入對應顯示旋轉角度的指令如下,重啟後生效

0:旋轉0度

1:旋轉270度

2:旋轉180度

3:旋轉90度

xrandr -o 1

1.2.2 若没有加載 KMS 或 FKMS 驅動,使用以下命令進行畫面顯示旋轉:

sudo nano /boot/config.txt

在 config.txt 檔案尾端輸入對應顯示旋轉角度的指令如下,重啟後生效

0:旋轉0度

1:旋轉90度

2:旋轉180度

3:旋轉270度

display_rotate=3

2. 觸控旋轉

2.1 安裝 libinput

sudo apt-get install xserver-xorg-input-libinput

如果你安裝的是 Ubuntu 系統,或是 Jetson Nano,安裝指令如下,

sudo apt install xserver-xorg-input-synaptics

2.2 在 /etc/X11/ 下建立 xorg.conf.d 資料夾(若該資料夾已存在,此步驟可跳過)

sudo mkdir /etc/X11/xorg.conf.d

2.3 複製 40-libinput-conf 檔案到剛建立的資料夾底下

sudo cp /usr/share/X11/xorg.conf.d/40-libinput.conf /etc/X11/xorg.conf.d/

2.4 編輯該檔案

sudo nano /etc/X11/xorg.conf.d/40-libinput.conf

2.5 找到 touchscreen 的部分,在裡面增加以下指令,然後存檔即可

Option "CalibrationMatrix" "0 1 0 -1 0 1 0 0 1"

類似下圖位置:

2.6 重啟樹莓派

sudo reboot

完成以上步驟即可進行 90 度旋轉。

備註:
90 度旋轉: Option “CalibrationMatrix” “0 1 0 -1 0 1 0 0 1”

180 度旋轉: Option “CalibrationMatrix” “-1 0 1 0 -1 1 0 0 1”

270 度旋轉: Option “CalibrationMatrix” “0 -1 1 1 0 0 0 0 1”
如何設定樹莓派電容式觸控螢幕右鍵快顯功能表

測試環境:2022-04-04-raspios-bullseye-armhf 32 位元系統
支援型號:微雪電子DSI LCD、DPI LCD和HDMI LCD電容式觸控螢幕系列

一、安裝軟體

wget https://www.waveshare.net/w/upload/1/18/Evdev-right-click-emulation.zip
unzip Evdev-right-click-emulation.zip
cd evdev-right-click-emulation
sudo apt install build-essential libevdev2 libevdev-dev
cd 'evdev-right-click-emulation'
sudo cp 'out/evdev-rce' '/usr/local/bin/'
sudo chmod +x '/usr/local/bin/evdev-rce'

執行指令

sudo evdev-rce

執行上列指令後,長按觸控螢幕即可出現右鍵快顯功能表

二、設定 pi 用戶可以執行

sudo usermod -G 'input' -a pi
echo 'uinput' | sudo tee -a /etc/modules
sudo nano /etc/udev/rules.d/99-uinput.rules

在 99-uinput.rules 檔案中增加下列這行

KERNEL=="uinput", MODE="0660", GROUP="input"

儲存後再執行

sudo udevadm control --reload-rules
sudo udevadm trigger

重新開機

sudo reboot

執行指令(不需要 sudo)

evdev-rce

執行上列指令後,長按觸控螢幕即可出現右鍵快顯功能表

三、設定開機啟動

輸入以下指令

sudo mkdir ~/.config/autostart
sudo nano ~/.config/autostart/right_click.desktop

在 right_click.desktop 增加程式碼如下

[Desktop Entry]
Version=1.0
Type=Application
Name=evdev-rce
GenericName=Enable long-press-to-right-click gesture
Exec=env LONG_CLICK_INTERVAL=1000 LONG_CLICK_FUZZ=200 /usr/local/bin/evdev-rce
Terminal=true
StartupNotify=false

如果要修改靈敏度可以修改 LONG_CLICK_INTERVAL=1000 LONG_CLICK_FUZZ=200 這兩個參數值的大小

Nvidia Jetson 系列商品比較表

 Jetson Nano Developer KitJetson TX2 Developer KitJetson Xavier NX
Developer Kit
Jetson AGX Xavier Developer Kit
AI Performance0.5 TFLOPS (FP16)1.3 TFLOPS (FP16)6 TFLOPS (FP16)
21 TOPS (INT8)
5.5-11 TFLOPS (FP16)
20-32 TOPS (INT8)
GPU128-core NVIDIA Maxwell™ GPU256-core NVIDIA Pascal™ GPU architecture with 256 NVIDIA CUDA coresNVIDIA Volta architecture with 384 NVIDIA CUDA® cores and 48 Tensor cores512-Core Volta GPU with Tensor Cores
CPUQuad-core ARM A57 @ 1.43 GHzDual-Core NVIDIA Denver 2 64-Bit CPU
Quad-Core ARM® Cortex®-A57 MPCore
6-core NVIDIA Carmel ARM®v8.2 64-bit CPU 6 MB L2 + 4 MB L38-Core ARM v8.2 64-Bit CPU, 8 MB L2 + 4 MB L3
Memory2GB/ 4GB 64-bit LPDDR4 25.6 GB/s8GB 128-bit LPDDR4
1866 MHz – 59.7 GB/s
8 GB 128-bit LPDDR4x @ 51.2GB/s32 GB 256-Bit LPDDR4x | 137 GB/s
Power Consumption5-10W7.5-15W10-15W10-30W

You can head over to NVIDIA Jetson Download Center to explore the necessary drivers and software for this product.

如何關閉樹莓派螢幕保護程式

一、開啟 lightdm.conf

sudo nano /etc/lightdm/lightdm.conf

二、修改 lightdm.conf

找到[Seat:*]底下”xserver-command=X “,取消註釋,修改如下:

[Seat:*]
...
xserver-command=X -s 0 -dpms

-s # :關閉螢幕保護程式
dpms :關閉電源管理

三、重新啟動即可

sudo reboot

四、備註:設定螢幕開啟或關閉

vcgencmd display_power 0
vcgencmd display_power 1

微雪電子各型電子紙(e-Paper)比較表

微雪電子各型電子紙(e-Paper)比較表

型號 顏色 灰度 解析度 顯示尺寸(mm) 外型尺寸(mm) 刷新時間(s) 局部刷新 Pi介面 控制介面
1.02inch e-Paper Module 黑、白 2 128×80 21.76 × 14.00 42.0 × 27.0 2 × SPI
1.54inch e-Paper Module 黑、白 2 200×200 27.00 × 27.00 48.0 × 33.0 2 × SPI
1.54inch e-Paper Module (B) 紅、黑、白 2 200×200 27.60 × 27.60 48.0 × 33.0 8 × × SPI
1.54inch e-Paper Module (C) 黄、黑、白 2 152×152 27.51 × 27.51 48.0 × 33.0 27 × × SPI
2.13inch e-Paper HAT 黑、白 2 250×122 48.55 × 23.71 65.0 × 30.2 2 SPI
2.13inch e-Paper HAT (B) 紅、黑、白 2 212×104 48.55 × 23.71 65.0 × 30.2 15 × SPI
2.13inch e-Paper HAT (C) 黄、黑、白 2 212×104 48.55 × 23.71 65.0 × 30.2 15 × SPI
2.13inch e-Paper HAT (D) 黑、白 2 212×104 48.55 × 23.71 59.2 × 29.2 2 SPI
2.7inch e-Paper HAT 黑、白 4 264×176 57.29 × 38.19 85.0 × 56.0 6 × SPI
2.7inch e-Paper HAT (B) 紅、黑、白 2 264×176 57.29 × 38.19 85.0 × 56.0 15 × SPI
2.9inch e-Paper Module 黑、白 2 296×128 66.89 × 29.05 89.5 × 38.0 2 × SPI
2.9inch e-Paper Module (B) 紅、黑、白 2 296×128 66.90 × 29.06 89.5 × 38.0 15 × × SPI
2.9inch e-Paper Module (C) 黄、黑、白 2 296×128 66.89 × 29.05 89.5 × 38.0 15 × × SPI
2.9inch e-Paper HAT (D) 黑、白 2 296×128 66.90 × 29.06 79.0 × 36.7 2 SPI
4.2inch e-Paper Module 黑、白 4 400×300 84.80 × 63.60 103.0 × 78.5 4 × × SPI
4.2inch e-Paper Module (B) 紅、黑、白 2 400×300 84.80 × 63.60 103.0 × 78.5 15 × × SPI
4.2inch e-Paper Module (C) 黄、黑、白 2 400×300 84.80 × 63.60 103.0 × 78.5 15 × × SPI
4.3inch e-Paper UART Module 黑、白 4 800×600 88.00 × 66.00 118.0 × 75.0 1.5 × × UART
5.83inch e-Paper HAT (B) 紅、黑、白 2 600×448 118.8 × 88.26 125.4 × 99.5 14 × SPI
5.83inch e-Paper HAT (C) 黄、黑、白 2 600×448 118.8 × 88.26 125.4 × 99.5 26 × SPI
6inch HD e-Paper HAT 黑、白 16 1448×1072 122.4 × 90.6 138.4 × 101.8 <1 USB/SPI/ I80
7.5inch e-Paper HAT 黑、白 2 800×480 163.2 × 97.92 170.2 × 111.2 5 × SPI
7.5inch HD e-Paper HAT 黑、白 2 880×528 163.24 × 97.94 170.2 × 111.2 5 × SPI
7.5inch HD e-Paper HAT (B) 紅、黑、白 2 880×528 163.24 × 97.94 170.2 × 111.2 21 × SPI
7.5inch e-Paper HAT (C) 黄、黑、白 2 640×384 163.2 × 97.92 170.2 × 111.2 16 × SPI
7.8inch e-Paper HAT 黑、白 16 1872×1404 158.18 × 118.64 173.8 × 127.6 <1 USB/SPI/ I80
9.7inch e-Paper HAT 黑、白 16 1200×825 202.80 × 139.43 218.8 × 156.4 <1 USB/SPI/ I80
10.3inch e-Paper HAT (D) 黑、白 16 1872×1404 209.664 × 157.248 227.7 × 165.8 <1 USB/SPI/ I80
12.48inch e-paper Module 黑、白 2 1304×984 252.98 × 190.90 280.0 × 229.5 <8 × SPI
12.48inch e-paper Module (B) 紅、黑、白 2 1304×984 252.98 × 190.90 280.0 × 229.5 <16 × SPI

如何安裝樹莓派虛擬鍵盤

1. 安裝所需軟體matchbox-keyboard

sudo apt update
sudo apt install matchbox-keyboard

2. 開啟編輯toggle-matchbox-keyboard.sh腳本

sudo nano /usr/bin/toggle-matchbox-keyboard.sh

3. 複製以下內容至toggle-matchbox-keyboard.sh腳本,存檔後退出

#!/bin/bash
#This script toggle the virtual keyboard
PID=`pidof matchbox-keyboard`
if [ ! -e $PID ]; then
killall matchbox-keyboard
else
matchbox-keyboard &
fi

4. 新增執行權限

sudo chmod +x /usr/bin/toggle-matchbox-keyboard.sh

5. 開啟編輯toggle-matchbox-keyboard.desktop桌面捷徑

sudo mkdir /usr/local/share/applications
sudo nano /usr/local/share/applications/toggle-matchbox-keyboard.desktop

6. 複製以下内容至toggle-matchbox-keyboard.desktop,存檔後退出

[Desktop Entry]
Name=Toggle Matchbox Keyboard
Comment=Toggle Matchbox Keyboard`
Exec=toggle-matchbox-keyboard.sh
Type=Application
Icon=matchbox-keyboard.png
Categories=Panel;Utility;MB
X-MB-INPUT-MECHANSIM=True

7. 使用”pi”用戶權限開啟編輯panel文件,注意此處不可以用管理員權限執行,否則會找不到檔案

sudo nano /etc/xdg/lxpanel/LXDE-pi/panels/panel

8. 在panel文件中找到類似以下區塊,注意不同版本圖示可能會有些微差異

Plugin {
type = launchbar
Config {
Button {
id=lxde-screenlock.desktop
}
Button {
id=lxde-logout.desktop
}
}

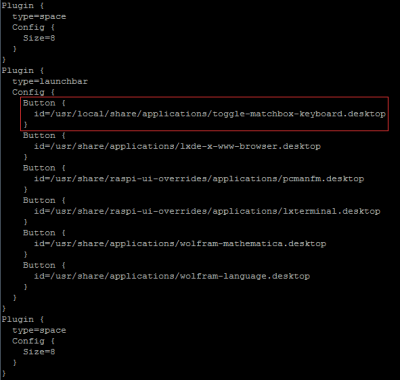
9. 新增以下內容至Button區塊,以新增虛擬鍵盤按鍵

Button {
id=/usr/local/share/applications/toggle-matchbox-keyboard.desktop
}

10. 完成後檔案內容大致如下,存檔後退出

RPILCD-INSTALL-KEYBOARD01.png

11. 重開機後應該可以看到螢幕左上角多了1個虛擬鍵盤圖示

sudo reboot

微雪電子LCD/OLED螢幕型錄對照表

微雪電子各型螢幕比較表

型號 影像 觸摸 聲音 支援主流設備
解析度 介面 面板 可視角度 類型 介面 面板 内建喇叭 訊號輸出 樹莓派 JETSON NANO 電腦
SPI螢幕
3.2inch RPi LCD (C) 320×240 高速SPI TFT 電阻 SPI × × × ×
3.5inch RPi LCD (B) 480×320 SPI IPS 160° 電阻 SPI × × × ×
3.5inch RPi LCD (C) 480×320 高速SPI TFT 電阻 SPI × × × ×
4inch RPi LCD (C) 480×320 高速SPI TFT 電阻 SPI × × × ×
DPI螢幕
7inch DPI LCD 1024×600 DPI IPS 170°
DSI螢幕
7inch DSI LCD 800×480 DSI TFT 電容 I2C 鋼化玻璃
7inch DSI LCD (with cam) 800×480 DSI TFT 電容 I2C 鋼化玻璃
HDMI / TYPE-C螢幕
3.5inch HDMI LCD 480×320 HDMI IPS 160° 電阻 SPI × × 僅顯示
4inch HDMI LCD 480×800 HDMI IPS 170° 電阻 SPI × × × 僅顯示
4inch HDMI LCD (C) 720×720 HDMI IPS 170° 電容 Type-C / I2C 鋼化玻璃
4inch HDMI LCD (H) 480×800 HDMI IPS 170° 電阻 SPI × × 僅顯示
4.3inch HDMI LCD (B) 800×480 HDMI IPS 160° 電容 USB ×
4.3inch DSI LCD 800×480 DSI IPS 160° 電容 I2C 鋼化玻璃 × × × ×
5inch DPI LCD 800×480 DPI IPS 160° × × × × × × ×
5inch HDMI LCD 800×480 HDMI TFT 電阻 SPI × × × ×
5inch HDMI LCD (附外殼) 800×480 HDMI TFT 電阻 SPI × × × ×
5inch HDMI LCD (B) 800×480 HDMI TFT 電阻 USB × × ×
5inch HDMI LCD (B) (附外殼) 800×480 HDMI TFT 電阻 USB × × ×
5inch HDMI LCD (G) 800×480 HDMI/VGA TFT 電阻 USB × ×
5inch HDMI LCD (H) 800×480 HDMI/VGA TFT 電容 USB 鋼化玻璃 ×
5.5inch HDMI AMOLED 1080×1920 HDMI AMOLED 170° 電容 USB 鋼化玻璃 ×
5.5inch HDMI AMOLED (附外殼) 1080×1920 HDMI AMOLED 170° 電容 USB 鋼化玻璃 × × ×
7inch HDMI LCD 1024×600 HDMI IPS 170° 電阻 SPI × × × 僅顯示
7inch HDMI LCD (B) 800×480 HDMI TFT 電容 USB × × ×
7inch HDMI LCD (B) (附外殼) 800×480 HDMI TFT 電容 USB × × ×
7inch HDMI LCD (C) 1024×600 HDMI IPS 170° 電容 USB × × ×
7inch HDMI LCD (C) (附外殼) 1024×600 HDMI IPS 170° 電容 USB × × ×
7inch HDMI LCD (H) 1024×600 HDMI/VGA IPS 170° 電容 USB ×
7inch HDMI LCD (H) (附外殼) 1024×600 HDMI/VGA IPS 170° 電容 USB 鋼化玻璃 ×
7inch FHD Monitor 1080×1920 HDMI IPS 170° 電容 USB 鋼化玻璃
7HP-CAPQLED 1024×600 HDMI IPS(QLED) 170° 電容 USB 鋼化玻璃
7.9inch HDMI LCD 400×1280 HDMI IPS 170° 電容 USB 鋼化玻璃 ×
9inch 2560×1600 Monitor 2560×1600 HDMI IPS 178° 電容 USB 鋼化玻璃
10.1inch HDMI LCD 1024×600 HDMI IPS 170° 電阻 SPI × × × 僅顯示
10.1inch HDMI LCD (B) (附外殼) 1280×800 HDMI IPS 170° 電容 USB 鋼化玻璃 × × ×
10.1inch HDMI LCD (E) 1024×600 HDMI IPS 170° 電容 USB 鋼化玻璃 ×
10.1inch HDMI LCD (G) (附外殼) 1920×1200 HDMI IPS 160° 電容 USB 鋼化玻璃
10.1inch HDMI LCD (H) (附外殼) 1024×600 HDMI/VGA TFT 電容 USB × ×
10.1HP-CAPQLED 1280×720 HDMI IPS(QLED) 170° 電容 USB 鋼化玻璃
10.5inch HDMI AMOLED 2560×1600 HDMI AMOLED 160° 電容 USB 鋼化玻璃
11.6inch HDMI LCD (H)(無外殼) 1920×1080 HDMI IPS 178° 電容 USB 鋼化玻璃 ×
11.6inch HDMI LCD (H) (附外殼) 1920×1080 HDMI/VGA IPS 178° 電容 USB 鋼化玻璃
12.5inch FHD Monitor 1920×1080 HDMI/Type-C IPS 178° 電容 Type-C / USB 鋼化玻璃
13.3inch HDMI LCD (H)(無外殼) 1920×1080 HDMI IPS 178° 電容 USB 鋼化玻璃 ×
13.3inch HDMI LCD (H) (附外殼) 1920×1080 HDMI/VGA IPS 178° 電容 USB 鋼化玻璃
13.3inch HDMI LCD (H) (附外殼) V2 1920×1080 HDMI/VGA IPS 178° 電容 USB 鋼化玻璃
15.6inch HDMI LCD(無外殼) 1920×1080 HDMI IPS 178° 電容 USB 鋼化玻璃 ×
15.6inch HDMI LCD (H) (附外殼) 1920×1080 HDMI/VGA IPS 178° 電容 USB 鋼化玻璃
15.6inch FHD Monitor 1920×1080 HDMI/Type-C IPS 178° 電容 Type-C / USB 鋼化玻璃

SPI螢幕

  • 優點:售價低
  • 缺點:幀率低,僅適合低解析度,僅支援樹莓派,佔用樹莓派40pin GPIO介面(SPI),樹莓派系统兼容性差

DPI螢幕

  • 優點:售價低,幀率高,支援多種解析度,樹莓派系統相容性佳
  • 缺點:僅支援樹莓派,佔用樹莓派40pin GPIO介面

DSI螢幕

  • 優點:售價適中,幀率高,不佔用樹莓派40pin GPIO介面,樹莓派系統相容性佳
  • 缺點:僅支援樹莓派

HDMI / TYPE-C螢幕

  • 優點:幀率高,支援多種解析度,支援多種設備,不佔用樹莓派40pin GPIO介面,樹莓派系統相容性佳
  • 缺點:售價較高

MFRC522簡介

MFRC522 is applied to the highly integrated read and write 13.56MHz contactless communication card chip, NXP launched by the company for the “table” application of a low-voltage, low-cost, small size of non-contact card chip, smart meters and portable handheld devices developed better choice. The MFRC522 use of advanced modulation and demodulation concept completely integrated in all types of 13.56MHz passive contactless communication methods and protocols. In addition, support rapid CRYPTO1 encryption algorithm, terminology validation MIFARE products. MFRC522 support MIFARE series of high-speed non-contact communication, two-way data transmission rate up to 424kbit/s.

Specification:

  1. Operating Current :13-26mA/DC 3.3V
  2. Idle Current :10-13mA/DC 3.3V
  3. Sleep Current: <80uA
  4. Peak Current: <30mA
  5. Operating Frequency: 13.56MHz
  6. Supported card types: mifare1 S50、mifare1 S70、mifare UltraLight、mifare Pro、mifare Desfire
  7. Environmental Operating Temperature: -20-80 degrees Celsius
  8. Environmental Storage Temperature: -40-85 degrees Celsius
  9. Relative humidity: relative humidity 5% -95%
  10. Data transfer rate: maximum 10Mbit/s
  11. Size: RFID-RC522 Module:3.9 x 6 cm
  12. The Standard S50 Blank Card :8.5 x 5.4 cm
  13. Diameter of S50 special-shaped card: 3.1(max)

PCA9685簡介

PCA9685簡介

The PCA9685 is an I2C-bus controlled 16-channel LED controller optimized for LCD Red/Green/Blue/Amber (RGBA) color backlighting applications. Each LED output has its own 12-bit resolution (4096 steps) fixed frequency individual PWM controller that operates at a programmable frequency from a typical of 40 Hz to 1000 Hz with a duty cycle that is adjustable from 0 % to 100 % to allow the LED to be set to a specific brightness value. All outputs are set to the same PWM frequency.

PCA9685 also has a built-in oscillator for the PWM control. However, the frequency used for PWM control in the PCA9685 is adjustable from about 40 Hz to 1000 Hz as compared to the typical 97.6 kHz frequency of the PCA9635. This allows the use of PCA9685 with external power supply controllers. All bits are set at the same frequency. The PCA9685 has 4096 steps (12-bit PWM)

如何調整樹莓派官方版7吋觸控螢幕亮度

如何調整樹莓派官方版7吋觸控螢幕亮度

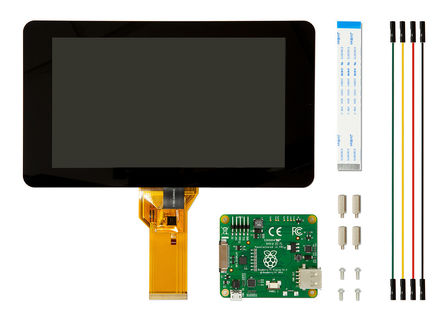
是否覺得樹莓派的觸控螢幕太亮了呢?

想要調整亮度卻找不到按鈕呢?

其實驅動程式就有提供 /sys/ 界面,讓使用者可以透由指令啟動或關閉螢幕,也可以調整螢幕亮度喔,詳細內容如下:

  1. 啟動螢幕:

    echo 0 > /sys/class/backlight/rpi_backlight/bl_power

  2. 關閉螢幕:

    echo 1 > /sys/class/backlight/rpi_backlight/bl_power

  3. 調整亮度:

    echo n > /sys/class/backlight/rpi_backlight/brightness
    這裡的n是 0 到 255的任一值

  4. 若出現 “Permission denied” 錯誤訊息,請在最前面加上 sudo bash -c 及” “,如:

    sudo bash -c "echo 0 > /sys/class/backlight/rpi_backlight/bl_power"

  5. 備註:’brightness’ 設定只對 v1.1版硬體有效,v1.0版 < 128 是關,>= 128 是開

樹莓派 Raspberry Pi GPIO 排針輸出腳位互動式教學

樹莓派 Raspberry Pi GPIO 排針輸出腳位互動式教學

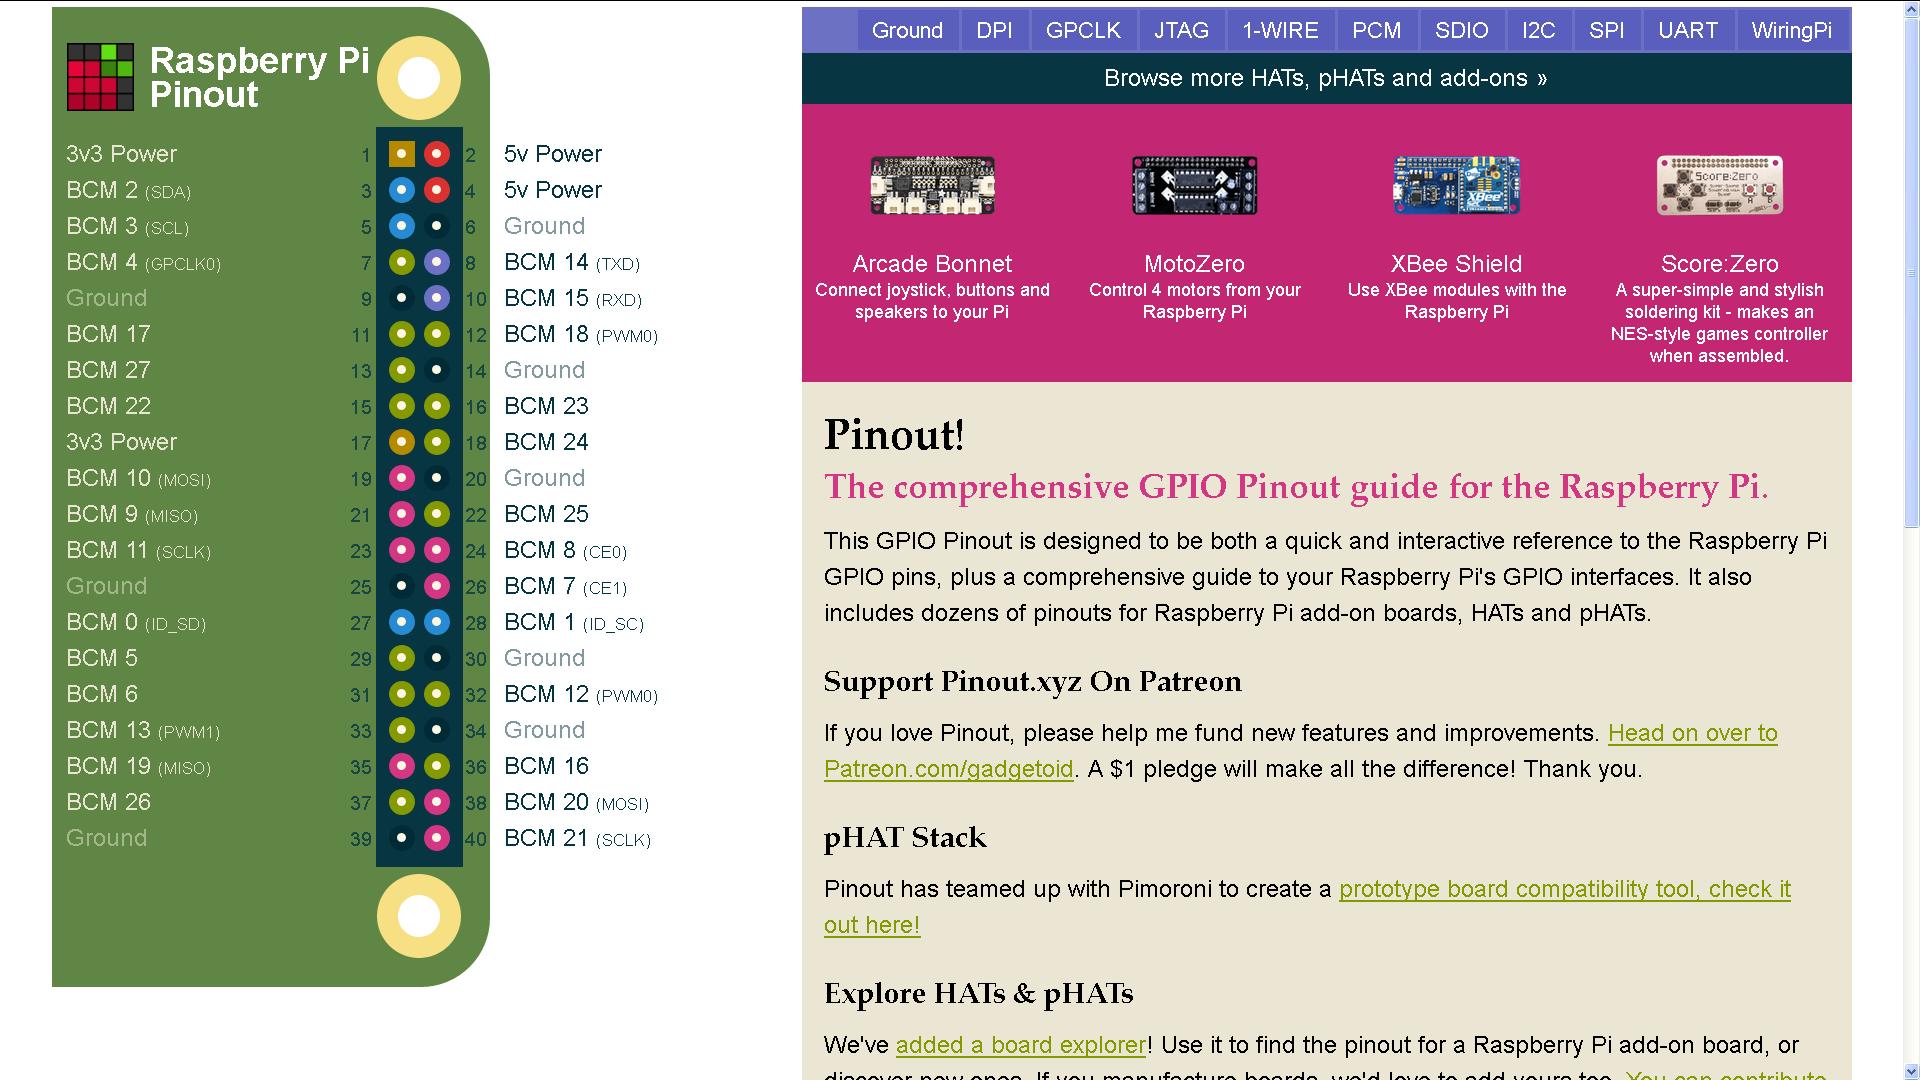
The comprehensive GPIO Pinout guide for the Raspberry Pi.

This GPIO Pinout is designed to be both a quick and interactive reference to the Raspberry Pi GPIO pins, plus a comprehensive guide to your Raspberry Pi’s GPIO interfaces. It also includes dozens of pinouts for Raspberry Pi add-on boards, HATs and pHATs.

Support Pinout.xyz On Patreon

If you love Pinout, please help me fund new features and improvements. Head on over to Patreon.com/gadgetoid. A $1 pledge will make all the difference! Thank you.

pHAT Stack

Pinout has teamed up with Pimoroni to create a prototype board compatibility tool, check it out here!

Explore HATs & pHATs

We’ve added a board explorer! Use it to find the pinout for a Raspberry Pi add-on board, or discover new ones. If you manufacture boards, we’d love to add yours too. You can contribute over on GitHub.

What do these numbers mean?

  • BCM – Broadcom pin number, commonly called “GPIO”, these are the ones you probably want to use with RPi.GPIO and GPIO Zero
  • WiringPi – Wiring Pi pin number (shown as a tooltip), for Gordon Henderson’s Wiring Pi library
  • Physical – Number corresponding to the pin’s physical location on the header
  • Rev 1 Pi – Alternate BCM numbers for the original, 26-pin model “A” and “B” Pi

Source comes from https://pinout.xyz/#

新產品發表囉! 樹莓派13.3吋 1920×1080 HDMI LCD (H)電容式觸控螢幕

樹莓派13.3吋 1920×1080 HDMI LCD (H)電容式觸控螢幕

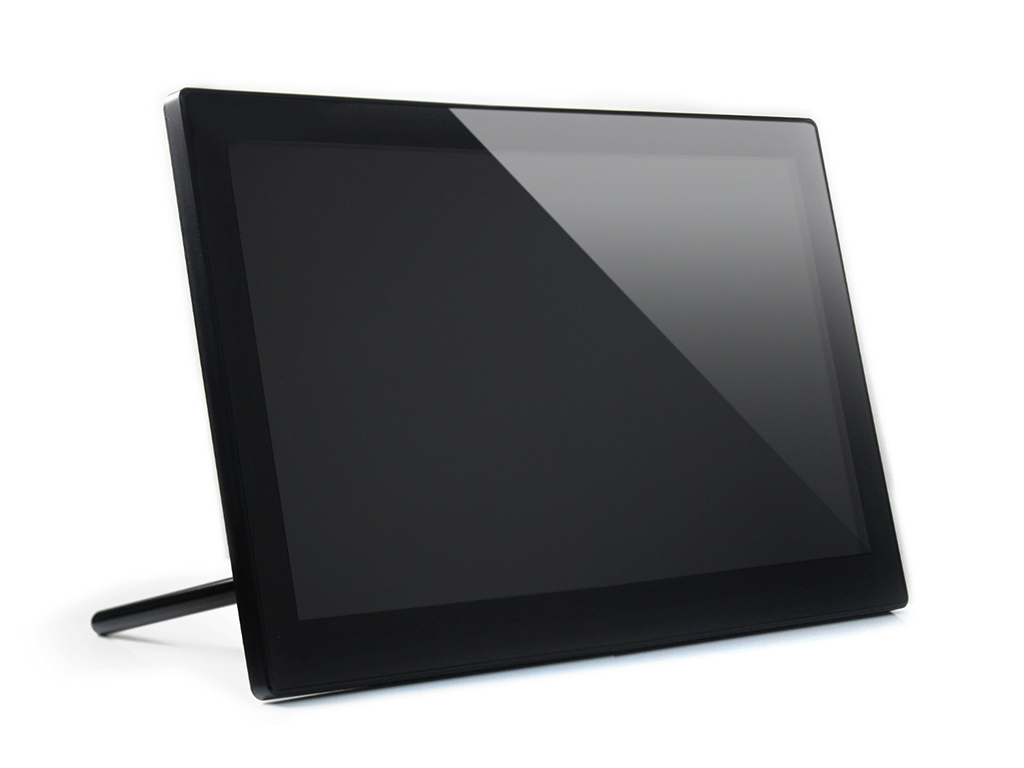
  1. 13.3吋IPS高階面板,1920×1080超清解析度
  2. 鋼化玻璃電容觸控面板,硬度達6H
  3. 支援Raspberry Pi、BB Black等主流mini PC
  4. 配合Raspberry Pi使用時,支援Raspbian、Ubuntu、WIN10 IOT 等作業系統,單點觸控,免安裝驅動程式
  5. 當作電腦螢幕使用時,支援Windows 10 / 8.1 / 8 / 7,10觸控,免安裝驅動程式
  6. 雙HDMI埠(單鍵切換無需插拔)
  7. 支援多國語言OSD目錄
  8. 可透過紅外線遙控器操作
  9. 附3.5mm連接埠,支援HDMI音響輸出
  10. 内置黑磁高傳真喇叭(無需外接音箱)
  11. 支援VGA輸入(需另購VGA轉接線)
  12. 支援壁掛,背面有75×75mm的壁掛固定孔(M4螺絲孔)
  13. 附75°傾斜角度支架

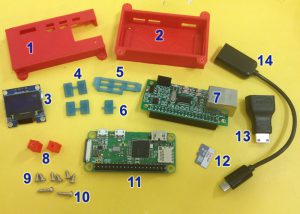
新產品發表囉! 樹莓派乙太埠擴充板(含Pi ZeroW, 遊戲盒套件)

1. 3D print Zero-W top cover
2. 3D print Zero-W base
3. 0.96″128×64 white OLED screen
4. Keypad double x2
5. Button Shaft
6. Keypad single
7. Pi-Zero-W-Net HAT board
8. 11mm spacer x2
9. M2.5 x6mm screw x6
10. M2.5 x10mm screw x2
11. Pi Zero W
12. 16Gb Micro SD card
13. Mini HDMI to HDMi adapter
14. micro USB OTG cable

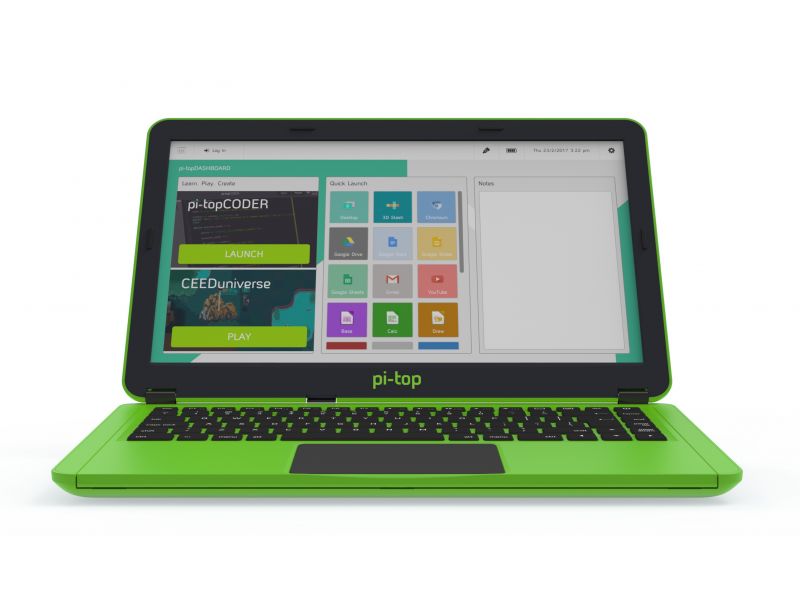
最新版樹莓派筆電Pi-Top V2-Green上市囉~

最新版樹莓派筆電Pi-Top V2–Green

  • User assembly Screw in Raspberry Pi
  • Slide hub
  • Clip on GPIO Bridge
  • Screw in GPIO Bridge Lock Screw
  • Chassis Product Dimensions: 345x220x40mm
  • Product Weight: 1.5kg tbc
  • Colour: Green with grey bezel
  • External ports:2x USB 2.0
  • 1x 10/100 Fast Ethernet
  • 1x Audio Jack (stereo)
  • Keyboard and trackpad105mm Sliding keyboard for internal access (US layout)
  • Keyboard:296x105mm (Full Size)
  • 16x16mm keys
  • 3.2mm Spacing
  • Trackpad:104x75mm
  • Gesture Control
  • Left and Right click
  • Modular Rail Magnetic Rails for pi-top Accessories
  • Internal USB 2.0 Port (for USB stick, internal hard drive etc)
  • Integrated CPU passive custom Cooling Bridge
  • No SPI used internally (meaning it is free for use with other HATs)
  • Includes SD Card Removal Tool
  • Display14” 1920×1080 FHD LCD screen
  • 180° Lid Opening
  • Battery6-8 hours battery life
  • 38.85 Watt-hour
  • 11.1V
  • Peripherals
    Charger:18V, 2.5A
    1.7x4mm Plug (This is not the same as pi-top)
    AU, EU, UK or US AC cable as standard
  • Raspberry Pi 3 Model B (only 40P type) and Tinker Board compatible

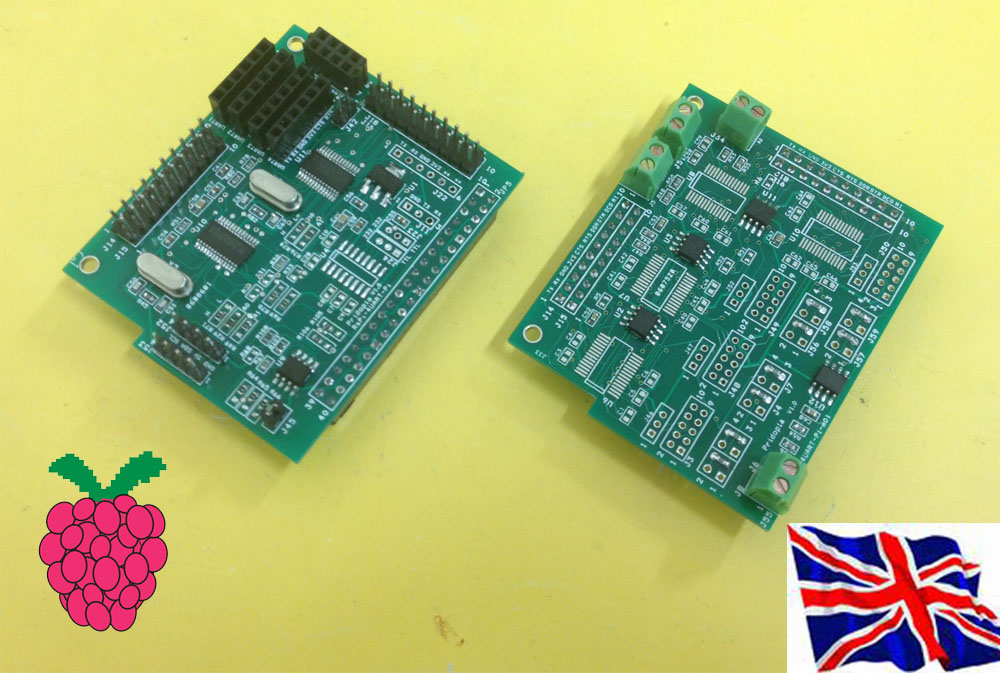
新產品*樹莓派RS485擴充板(4埠, UART)*

新產品*樹莓派 RS485 擴充板(4埠)*發表囉~ 歡迎來信選購或洽詢~

商品規格

1. Provide extra 4 UART TTL output

4x UART TTL output TX, RX, GND, 3V3, CTS, RTS

2. 2 sets I2C signal output GND, 5V, SDA, SCL for extend extra UART HAT

3. TTL UART1 support ESP8266 WiFi module socket

4. Provide an individual 3.3V power for UART & output port

5. Provide HAT EEPROM for future driver program update.

Provide other Linux OS support (without HAT EEPROM )(option)

6. Extension port for RS232/RS485 module board

7. Raspberry Pi 3B & Pi Zero W still can use on board Bluetooth & WiFi

8. Provide Serial GUI Control Panel– Control up to 4 Serial Ports

9. Provide command line mode to activate serial ports through terminal/ssh.

相關文件

Software Pack

商品內容

1x Rs-Pi 4xUART-Ext Main Board

1x RS485x4 extension board

1x Manual